Configuring Secure DMVPN Tunnels
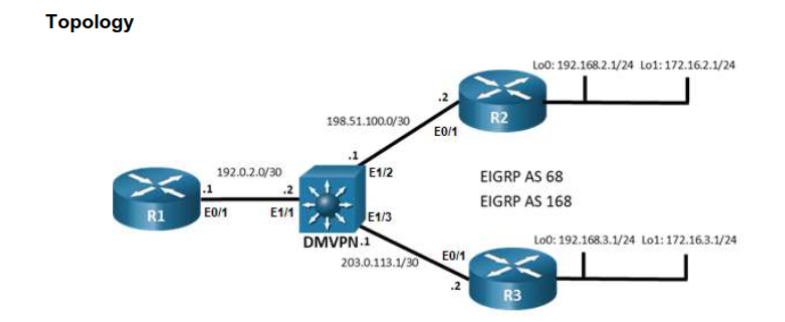
In this lab, I explore how to secure a DMVPN Phase 3 network with IPsec. DMVPN dynamically builds GRE tunnels between the hub and spokes, while IPsec encrypts the traffic running over them. I start by verifying the existing DMVPN setup, then configure IKE policies and IPsec protection on the hub and spokes, and finally verify that the security associations (SAs) are established and that spoke-to-spoke tunnels work as expected.
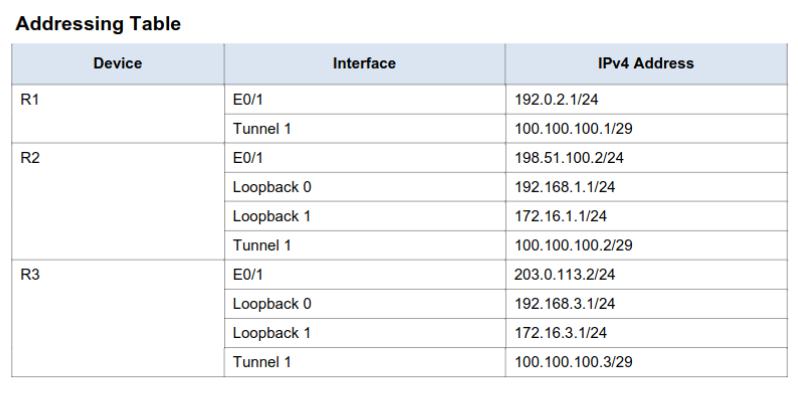
IPsec functionality is essential for a DMVPN implementation.
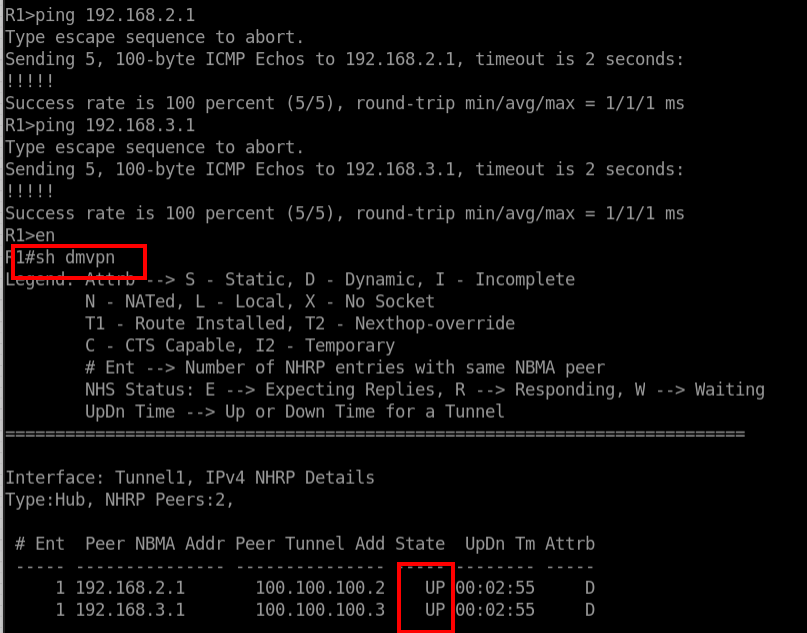
Step 1: Verify DMVPN operation
I will ping the loopback addresses of R2 and R3 from R1 and use the show dmvpn command.
Step 2: Secure DMVPN Phase 3 tunnels
First, I need to create the IKE policy that defines the hash algorithm, encryption type, key exchange method, Diffie-Hellman group, and authentication method.
IKE (Internet Key Exchange) is the protocol that sets up and manages the secure “handshake” between two devices before an IPsec VPN tunnel can protect real traffic.
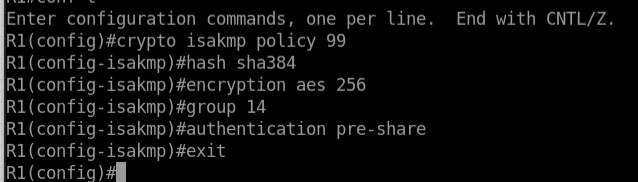
This configuration block sets the IKE Phase 1 parameters on R1 so that when it communicates with R3, both routers agree on the same hash, encryption method, Diffie-Hellman group, and authentication method to build the secure control channel.
I created an IKE/ISAKMP policy with the number 99, which uniquely identifies the policy and assigns it a priority (higher numbers = lower priority).
Next, I will create the pre-shared key and peer address. I will use 0.0.0.0 to match multiple peer addresses and use DMVPN@key# as the key.

Now I will configure the IPsec transform set.

There are two tunnel modes available: transport mode and tunnel mode.
Tunnel mode: The entire original packet is encapsulated inside a new IP packet, so only the VPN endpoints’ IP addresses are visible on the network.
Transport mode: Only the payload of the original packet is encrypted, while the original sender and receiver IP addresses remain visible and unchanged.
Next, I create an IPsec profile that bundles the IPsec protection settings and can later be applied to a tunnel interface.

The IPsec profile acts like a template that says: “when you apply me to a tunnel, protect that tunnel using the transform set DMVPN_TRANS.”
The command used to apply the IPsec profile to an interface is:
tunnel protection ipsec profile <profile-name>
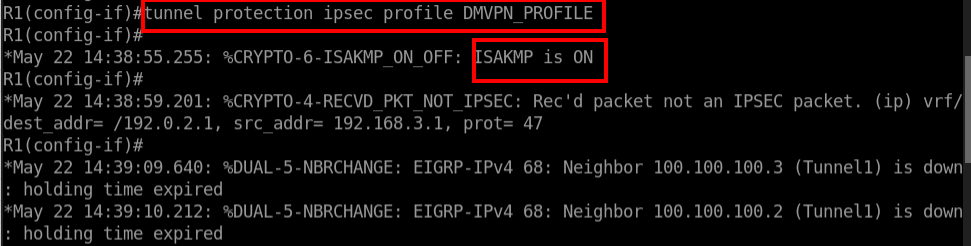
At this point, the routers are running EIGRP, but because R2 and R3 are not yet configured with IPsec, they fail to establish both the EIGRP neighbor adjacency and the IPsec security associations.
I will now configure IPsec properly on R2 and R3. Since the hub’s interface uses a dynamic IP address, I will use 0.0.0.0 0.0.0.0 as the peer address. Otherwise, I would use the hub’s public IP address directly.
On R2 and R3:
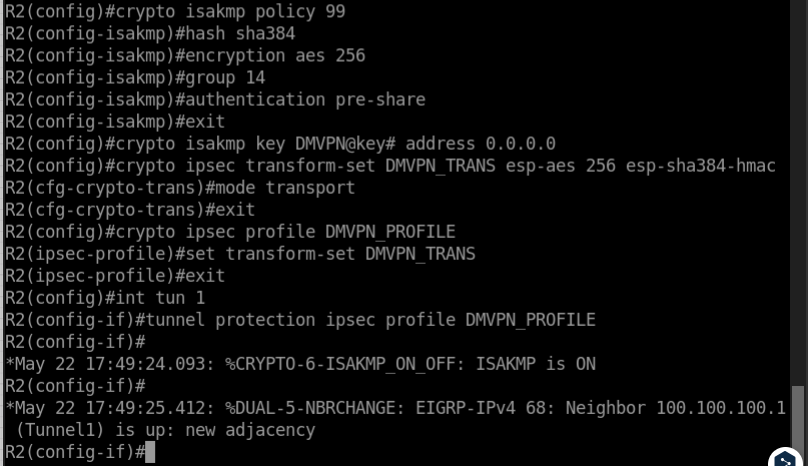
Tip: To help me remember these four steps, I think of it this way: I use the crypto isakmp command twice (for policies and pre-shared keys) and the crypto ipsec command twice (for the transform set and the profile), and then I apply the IPsec profile to the tunnel interface.
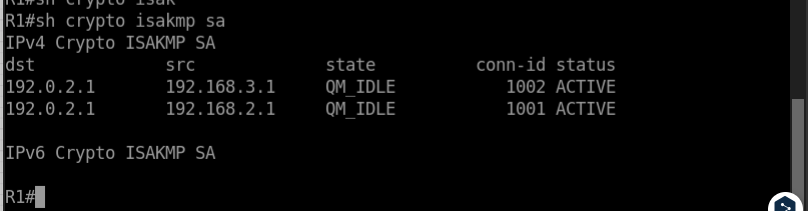
Now, back on R1, I check the security associations and verify that the SAs with R2 and R3 are formed correctly, which they are.
Another useful command is show crypto ipsec sa. It displays the IPsec Phase 2 SAs, which are the security associations responsible for encrypting and authenticating the actual data traffic.
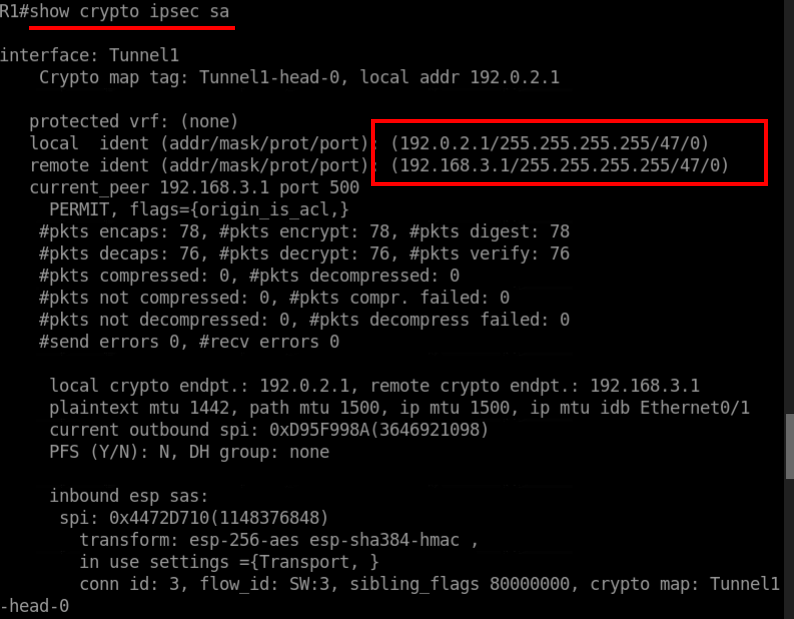
The first address corresponds to R1 and the second one to R3. Below that, R2 will also appear.
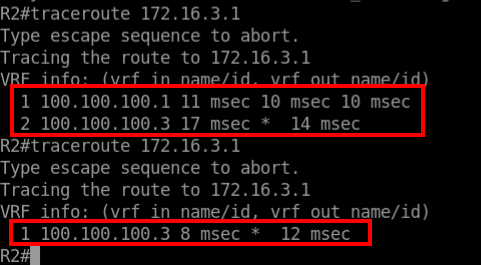
To finish the lab, I run a traceroute from R2 to the simulated LAN interface on R3. Then I run the traceroute again. This time, I can see that R1 has enabled direct spoke-to-spoke communication between R2 and R3.
This tunnel expires and closes dynamically when it is no longer needed. The tunnel automatically reopens when new traffic is sent between the spokes.
In the end, this lab showed me how DMVPN and IPsec work together: DMVPN dynamically builds the GRE tunnels, while IPsec protects them using strong encryption and IKE negotiation.
Here are my three must-remember takeaways from this lab:
IKE and IPsec are separate layers
First, you configure IKE (ISAKMP) to establish the secure control channel. Then, you configure IPsec (transform set + profile) to protect the actual data traffic.The hub uses
0.0.0.0for dynamic spokes
On the hub, usingcrypto isakmp key ... address 0.0.0.0 0.0.0.0allows a single pre-shared key to work with multiple spokes, which is especially useful in DMVPN environments with dynamic IP addresses.Always verify both SA types
Useshow crypto isakmp sato confirm that the IKE tunnel is established, and useshow crypto ipsec sato verify that real traffic is actually being encrypted between the peers.