Implementing IPsec Site-to-Site VPNs
Addressing Table
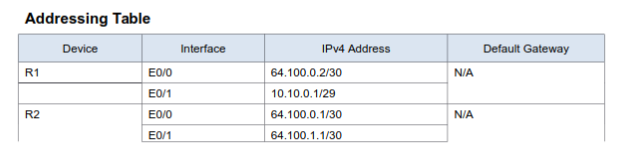
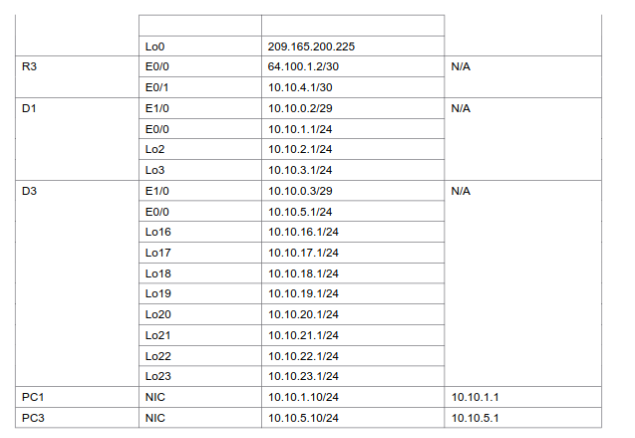
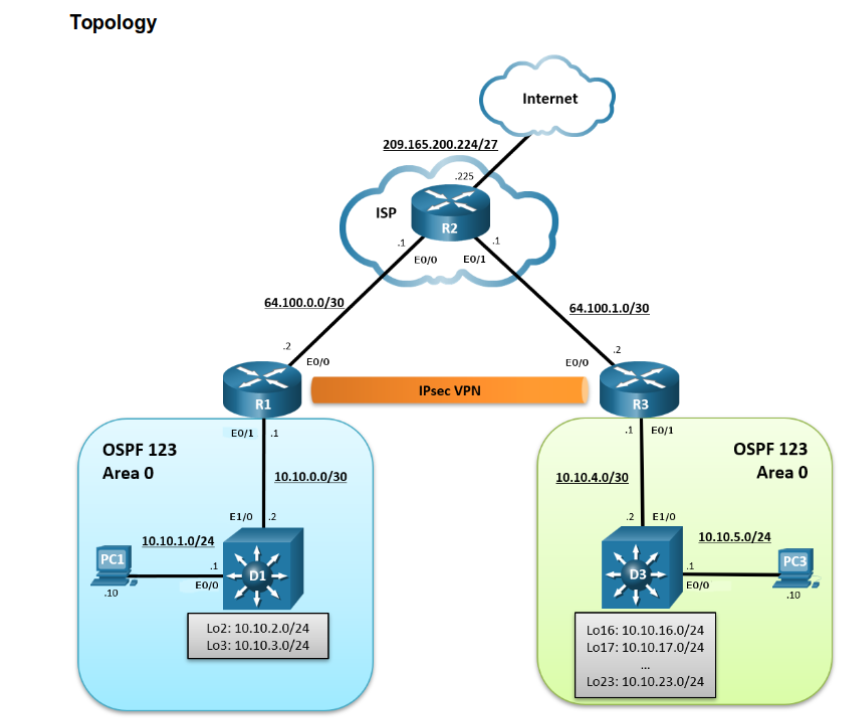
In this lab, I will establish a site-to-site IPsec VPN tunnel between R1 and R3 through R2. R2 acts as the ISP router and has no knowledge of the VPN itself. This means R2 simply forwards the encrypted traffic between R1 and R3 without participating in the VPN negotiation, key exchange, or encryption/decryption process.
VPN negotiation is the process where R1 and R3 agree on parameters such as encryption algorithms and lifetimes to establish the tunnel. Key exchange (for example through IKE) securely generates shared keys, which are then used to encrypt traffic at the sender and decrypt it at the receiver. IPsec operates at the Network layer (OSI Layer 3).
IPsec is an open framework that allows security protocols and encryption algorithms to evolve as new technologies are developed.
There are two central configuration elements in the implementation of an IPsec VPN:
Implement Internet Key Exchange (IKE) parameters
(how the two devices agree on keys and establish the VPN)Implement IPsec parameters
(how the actual data is encrypted and protected after the tunnel is established)
Step 1: On R1 and R3, Implement Internet Key Exchange (IKE) Parameters
In this step, I will configure IKE policies on R1 and R3. IKE Phase 1 defines the key exchange method used to exchange and validate IKE policies between peers. In IKE Phase 2, the peers exchange and match IPsec policies used for authentication and encryption of data traffic.
So:
- Phase 1 = “secure handshake channel” (IKE-SA) between R1 and R3
- Phase 2 = “data-protection channel” (IPsec-SA) that encrypts the actual traffic
IKE must be enabled for IPsec to function. IKE is enabled by default on IOS images with cryptographic feature sets. If it is disabled, it can be enabled with the command crypto isakmp enable. If that command produces an error, the device likely needs an upgraded IOS image.
For IKE Phase 1, you define an ISAKMP policy with authentication, encryption, and hashing algorithms. Once both routers accept the ISAKMP security association (SA), Phase 1 is complete.
A security association (SA) is an agreement between two devices that defines how traffic is encrypted, authenticated, and protected in an IPsec VPN.
Step 2: Create a Custom ISAKMP Policy
To create a custom ISAKMP policy, I enter ISAKMP configuration mode using the command crypto isakmp policy <number> in global configuration mode.
The policy number uniquely identifies the IKE policy and also determines its priority, where 1 is the highest priority. This means the router will try ISAKMP policy 1 first, then 2, then 3, and so on when negotiating IKE with the remote peer.
I will create ISAKMP policy 10 and check the available parameters.
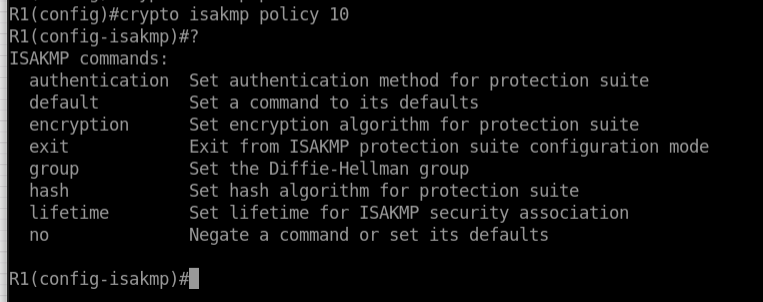
As shown by typing ?, multiple IKE parameters are available. The following list contains the minimum recommended options.
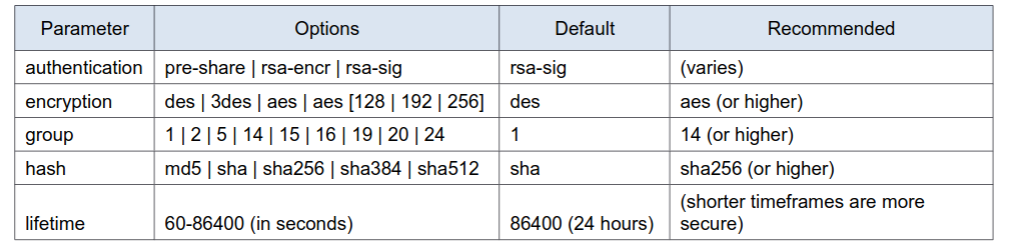
Entering ISAKMP policy configuration mode automatically assigns default parameters to the policy. To view these defaults, I use the command:
do show crypto isakmp policy
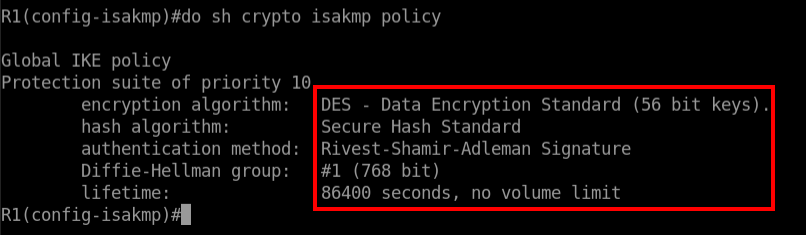
The output highlights, inside the red square, the default parameters. For security reasons, most of these should be updated to the recommended minimum values shown in the previous table.
The Parameters Explained
Encryption algorithm
Determines how confidential the control channel is by encrypting the negotiation messages.Hash algorithm
Controls data integrity, ensuring that the data received from the peer has not been tampered with in transit.Authentication type
Ensures the packets truly come from the intended peer and not from an attacker.Diffie-Hellman group
Generates a shared secret key between the peers without sending the key itself across the network.
In this lab, I will configure the following parameters for ISAKMP policy 10 on both R1 and R3:
- Encryption: AES-256
- Hash: SHA-256
- Authentication method: Pre-shared key
- Diffie-Hellman group: 14
- Lifetime: 3600 seconds (60 minutes)
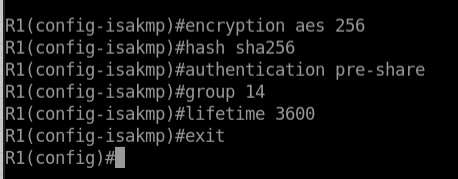
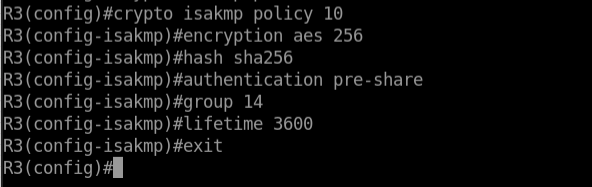
Using the show crypto isakmp policy command again, I can verify the changes.
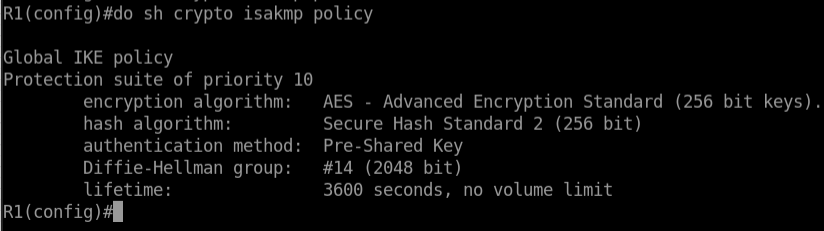
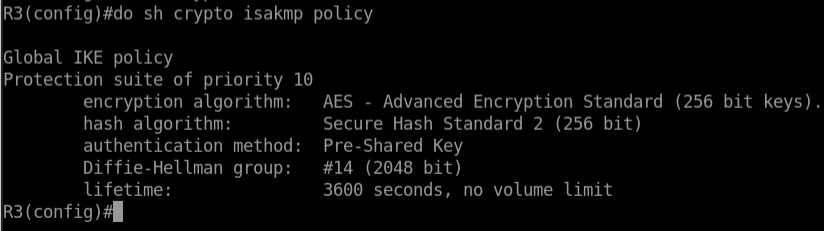
The policies must match on both peers.
Step 3: Configure the Pre-Shared Keys
Because pre-shared keys are used as the authentication method in the IKE policy, a key must be configured on each router pointing to the remote VPN endpoint. These keys must match for authentication to succeed.
The command used is:
crypto isakmp key <key-string> address <ip-address>
In this case, the IP address refers to the global IP address of the remote peer, which is the outside interface of the remote router.
The ip-address parameter can also be configured as:
0.0.0.0 0.0.0.0
to allow a match against any peer. This is useful when the peer IP is dynamic, unknown, or when a single policy should apply to multiple peers.
The outside interface of R3 is e0/0 with IP address 64.100.1.2.
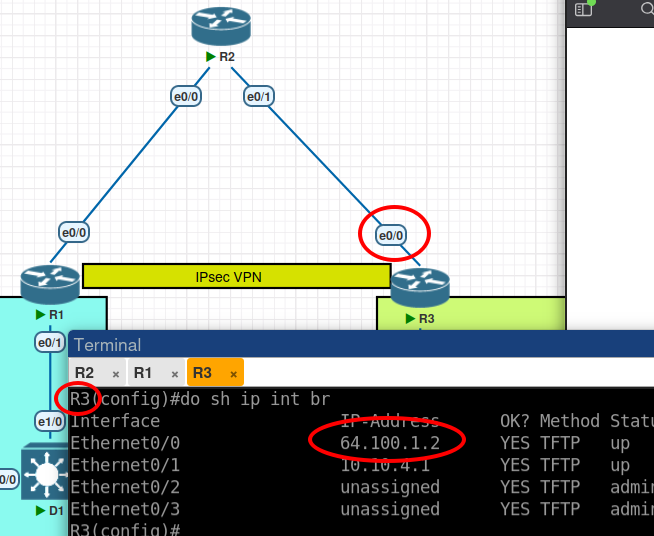
So on R1, the command will point to that address.

On R3, I will instead use the outside interface IP address of R1.
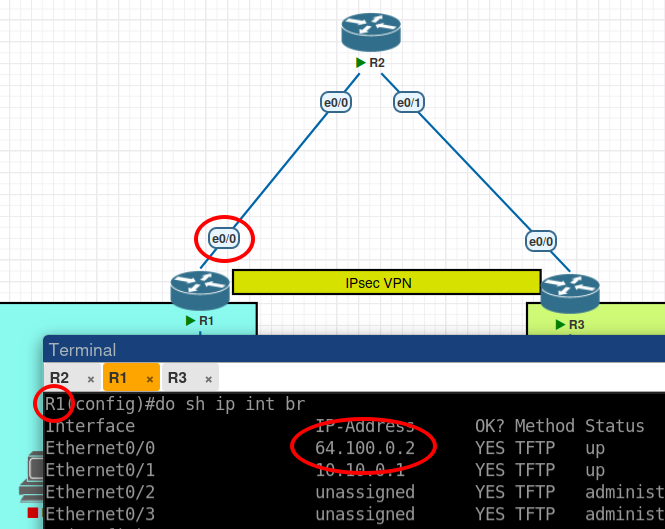
So the final configuration becomes:

Note: Production networks should use longer and more complex keys.
Step 4: Configure the IPsec Transform Set
The IPsec transform set is another cryptographic parameter negotiated between the routers to form a security association.
To create an IPsec transform set, the command used is:
crypto ipsec transform-set <transform-set-name> <transform1> [transform2]
An IPsec transform set is a named group of settings that defines how VPN traffic is protected, including the encryption algorithm, integrity algorithm, and tunnel mode. R1 and R3 must agree on the same transform set so they can establish matching IPsec security associations for the tunnel.
The ISAKMP configuration from Step 1 protects the control messages exchanged during IKE Phase 1, but the IPsec transform set defines how the actual user data is encrypted and authenticated inside the VPN tunnel during IPsec Phase 2.
On R1 and R3, I will create a transform set named S2S-VPN and use ? to check the available parameters.
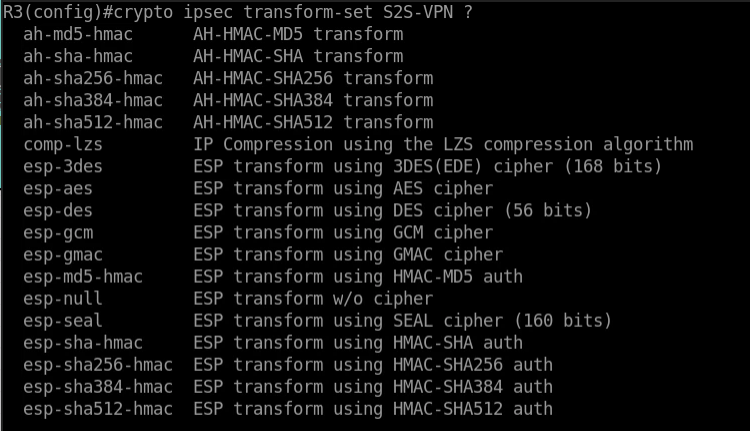
This list shows the available IPsec transform options on Cisco routers:
ah-xxx(for exampleah-sha-hmac)
Uses the Authentication Header (AH) protocol, which provides authentication and integrity only, without encryption.esp-xxx(for exampleesp-aes,esp-sha-hmac)
Uses the Encapsulating Security Payload (ESP) protocol, which can provide encryption, integrity, or both.xxx-hmac(for exampleesp-sha-hmac)
Refers to HMAC (Hash-based Message Authentication Code), which verifies packet integrity and authenticity.esp-aes,esp-3des,esp-des
These are encryption algorithms that determine how traffic is encrypted inside the tunnel.
R1(config)# crypto ipsec transform-set S2S-VPN esp-aes 256 esp-sha256-hmac
R3(config)# crypto ipsec transform-set S2S-VPN esp-aes 256 esp-sha256-hmac
Note: The transforms inside the transform set do not need to match the ISAKMP policy. They can be different, as long as both peers agree on the IPsec transforms.
Step 5: Define Interesting Traffic
It is necessary to define interesting traffic so the router knows which traffic should trigger the IPsec VPN tunnel.
I will do this using an extended ACL to specify which traffic should be encrypted. Traffic denied by the ACL is not dropped; it is simply forwarded normally without encryption.
In this scenario, from the perspective of R1, the traffic I want to encrypt is traffic going from the R1 LANs to the R3 LANs. From the perspective of R3, the ACL must be mirrored.
These ACLs are applied outbound on the VPN endpoint interfaces and must mirror each other.
On R1

On R3

For a site-to-site IPsec tunnel to work correctly, the interesting-traffic ACLs must be mirrored, meaning the source and destination networks are swapped on the opposite peer.
If the ACLs are not mirrored, the tunnel may still come up, but the traffic you expect to encrypt will not match the IPsec policy and will bypass the tunnel.
Step 6: Create and Apply a Crypto Map
A crypto map associates traffic matching an ACL with a peer and specific IKE/IPsec settings.
After the crypto map is created, it can be applied to one or more interfaces. These interfaces should face the IPsec peer.
To create a crypto map, use:
crypto map <name> <sequence-number> ipsec-isakmp
I will create the crypto map on R1 with the following settings:
- Name:
S2S-CMAP - Sequence number:
10 - Type:
ipsec-isakmp
This means IKE will be used to establish the IPsec security associations.

Now I will use the ACL to specify which traffic should be encrypted.

Next, I set the peer IP address, which is required. This will point to R3’s VPN endpoint interface.

Then I use the set transform-set command to specify which transform set should be used for this peer.

I then mirror the crypto map configuration on R3.
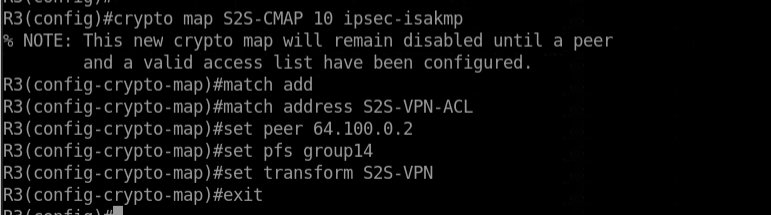
Finally, the crypto maps must be applied to the interfaces.


Verifying the VPN
Now that the VPN is configured, I will test it to verify that it works as expected.
Useful commands:
show crypto ipsec transform-set S2S-VPN show crypto map

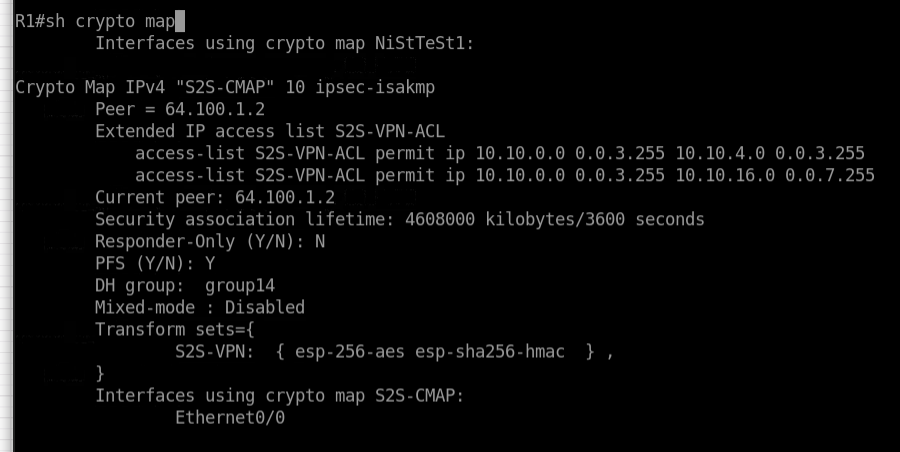
The show crypto isakmp sa command reveals that no IKE security associations exist yet. Once interesting traffic is generated, this output changes.

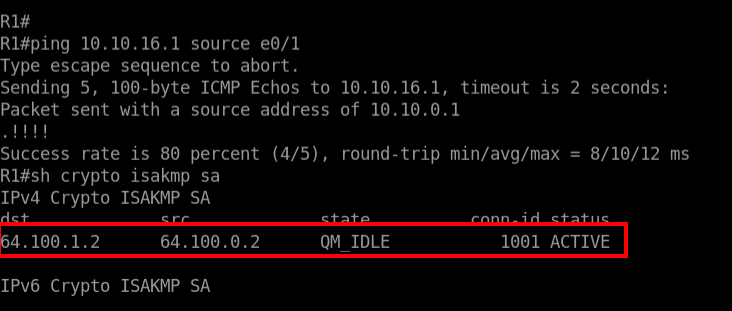
The same verification can be done on R3.
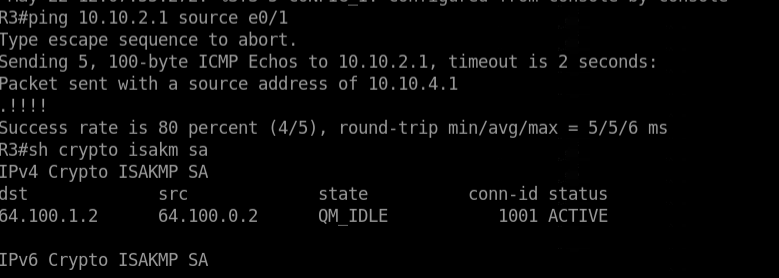
This output confirms that the exercise is complete and that the IPsec site-to-site VPN is functioning correctly.
Takeaway
Overall, this lab helped me understand how an IPsec site-to-site VPN is built in layers: first IKE establishes a secure control channel, then IPsec protects the actual data traffic, while the ISP router in the middle simply forwards encrypted packets without any involvement.
The key takeaway is that both the IKE and IPsec parameters must match on both peers, and the interesting-traffic ACLs must also be mirrored so the routers agree on what traffic should be encrypted.
Seeing the tunnel come up and the security associations appear after generating traffic was a satisfying confirmation that all the components were finally working together.